
Not everyone has a sweet tooth, simply cupcakes are an exception because everyone loves it. Despite its tiny size, it will surely take your taste buds on an enjoyable and flavorful experience.
Fifty-fifty more than so if the cupcakes have sprinkles and a scarlet on top, then you're definitely in for a treat. What amend way to showcase your artistic skills than cartoon a delicious cupcake?
Fortunately, we have curated a step-past-footstep tutorial on how to draw a cupcake, summarized in nine piece of cake and unproblematic steps.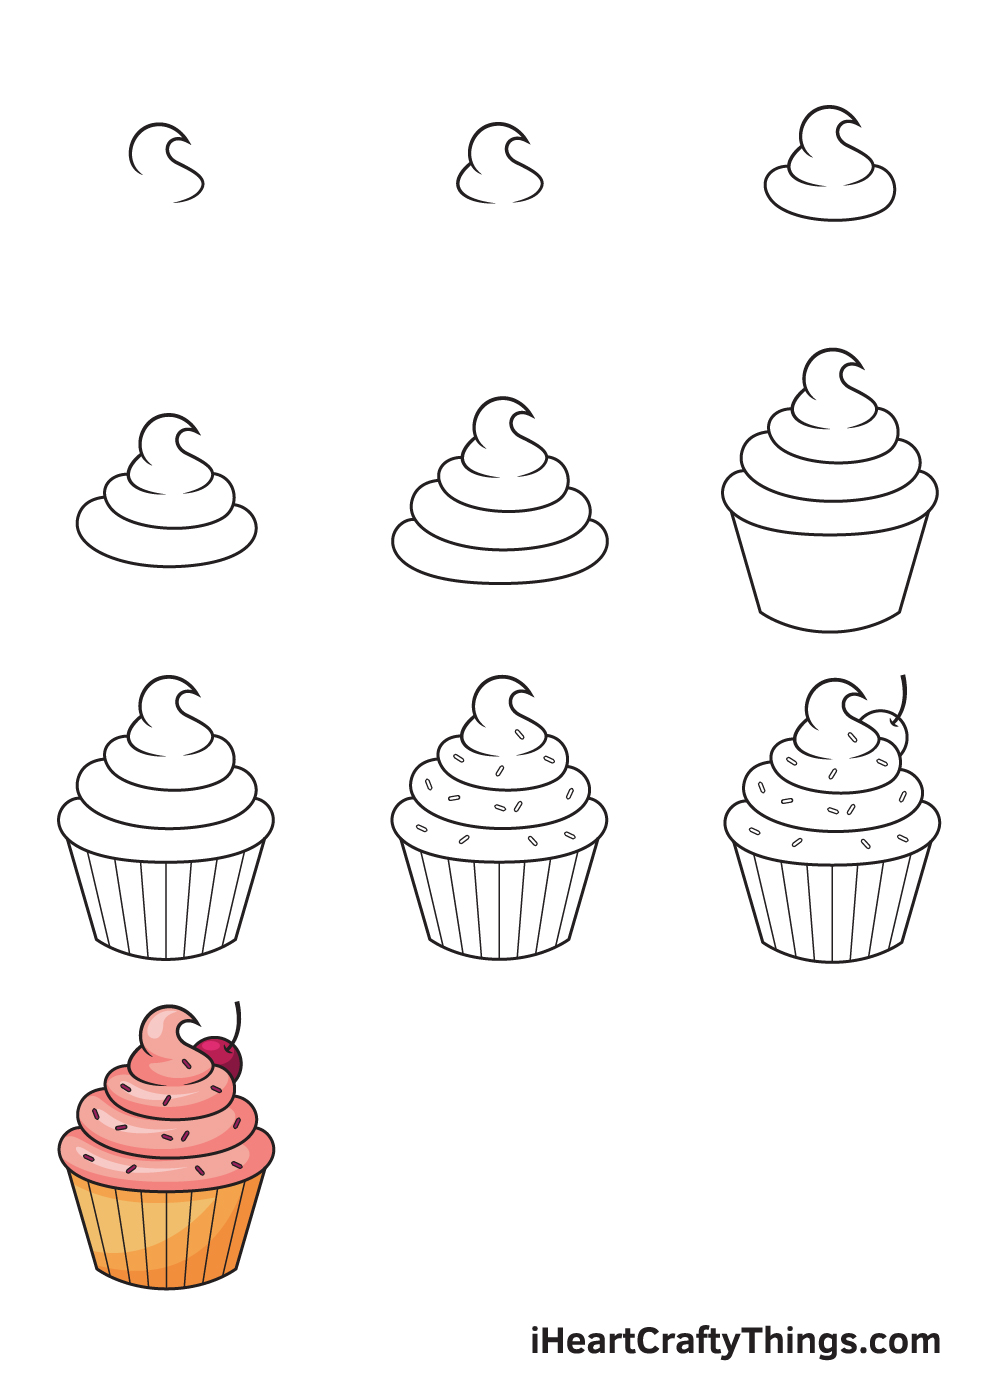
You can apply these steps whether you want to draw a realistic-looking cupcake or an animated one. Each step is accompanied with comprehensible illustrations that serve as your visual guide every bit you lot follow the instructions.
Whether you lot are a novice or an expert in drawing, we're sure you can follow these steps effortlessly. What's more than, y'all tin can add your own style and improvise in every step.
Mix and match colors to personalize your artwork and make information technology unique. Feel free to let your imagination wander and unleash your creativity.
Take fun creating your very own unique and delectable cupcake cartoon!
What's in this Weblog Post
- How to Depict a Cupcake — Let's become started!
- STEP i
- Footstep 2 — Describe the Topmost Role of the Frosting
- Step 3 — Next, Add a Layer of Frosting
- Step four — Depict the Center of the Frosting
- Stride 5 — Draw the Terminal Layer of Frosting
- Stride 6 — Now, Draw the Wrapper of the Cupcake
- Step 7 — So, Draw the Folds of the Wrapper
- Step eight — Put Sprinkles on the Frosting
- Step 9 — Add together Your Topping of Pick
- Your Cupcake Drawing is Complete!
How to Draw a Cupcake — Allow's get started!
STEP 1

Starting at the upper portion of your cartoon space, create the frosting past drawing a tip of a swirl. When drawn correctly, it should await like a curved droplet of water. And of course, you lot can make the frosting appear as large or as pocket-sized equally yous adopt.
Continue in mind to start drawing from the top to the bottom to give you lot sufficient infinite to depict your entire cupcake along with its wrapper.
Hither's a useful tip: in order to ensure that the cupcake will be drawn in the middle, you tin describe a horizontal and vertical line across the newspaper to serve every bit your reference lines.
Step 2 — Draw the Topmost Office of the Frosting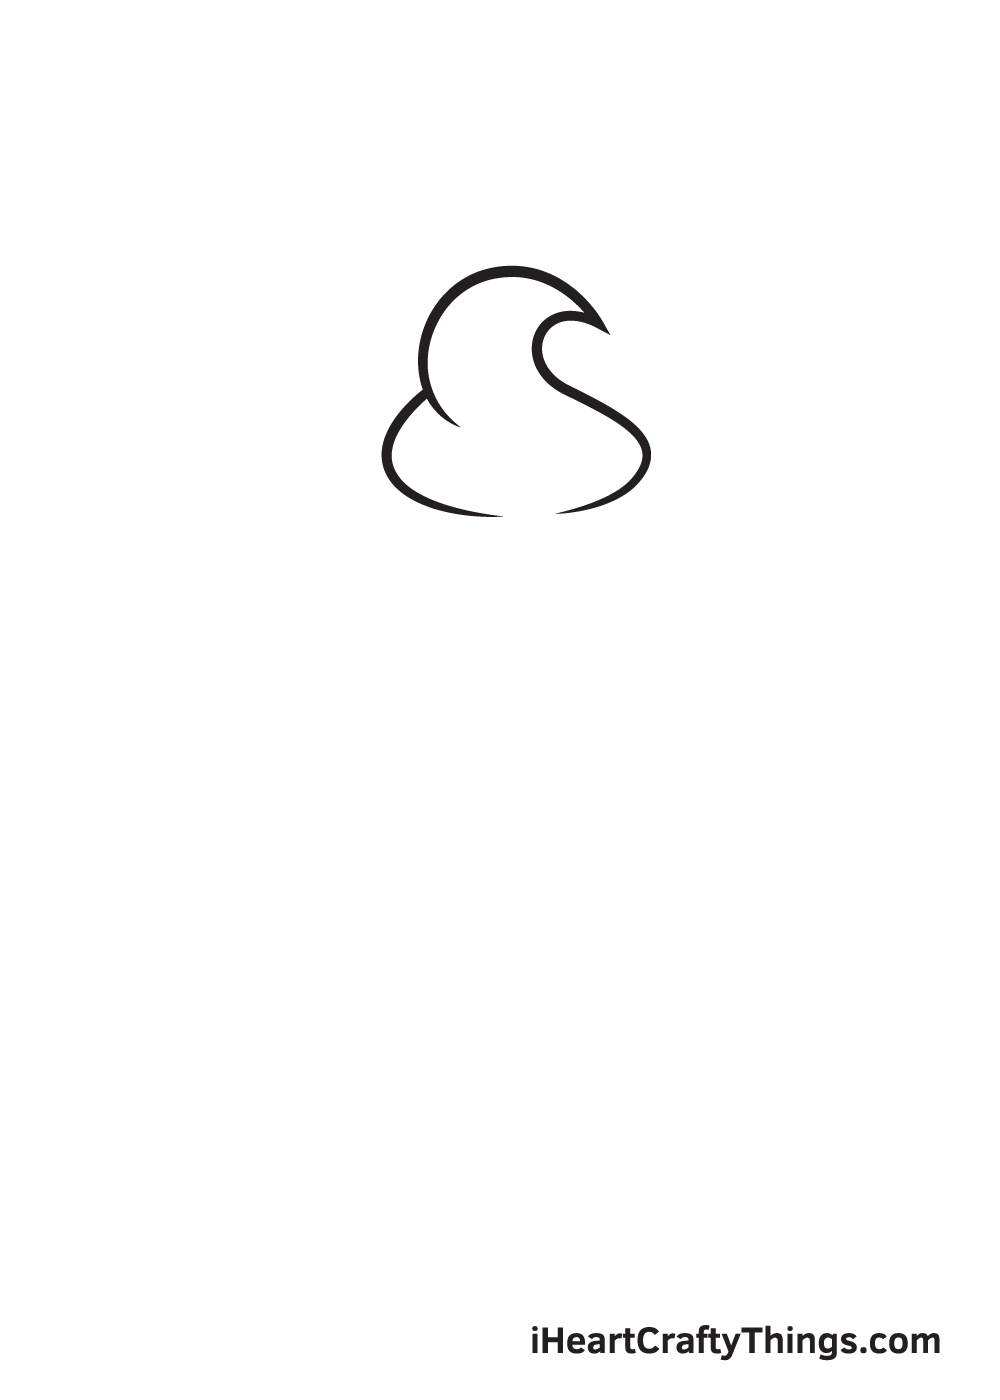
At present that you take drawn the tip of the frosting in the previous step, it'south time to complete the topmost layer of the icing.
Draw a curved line on either side of the frosting's tip to create ane layer of frosting. Make sure that the both ends of the line are close to each other, simply don't meet.
When drawing the icing, it'southward of import to keep in listen that you lot're working from top to bottom and non the other way effectually. That means, the adjacent layers of icing will be drawn right underneath the previous one.
Footstep 3 — Next, Add a Layer of Frosting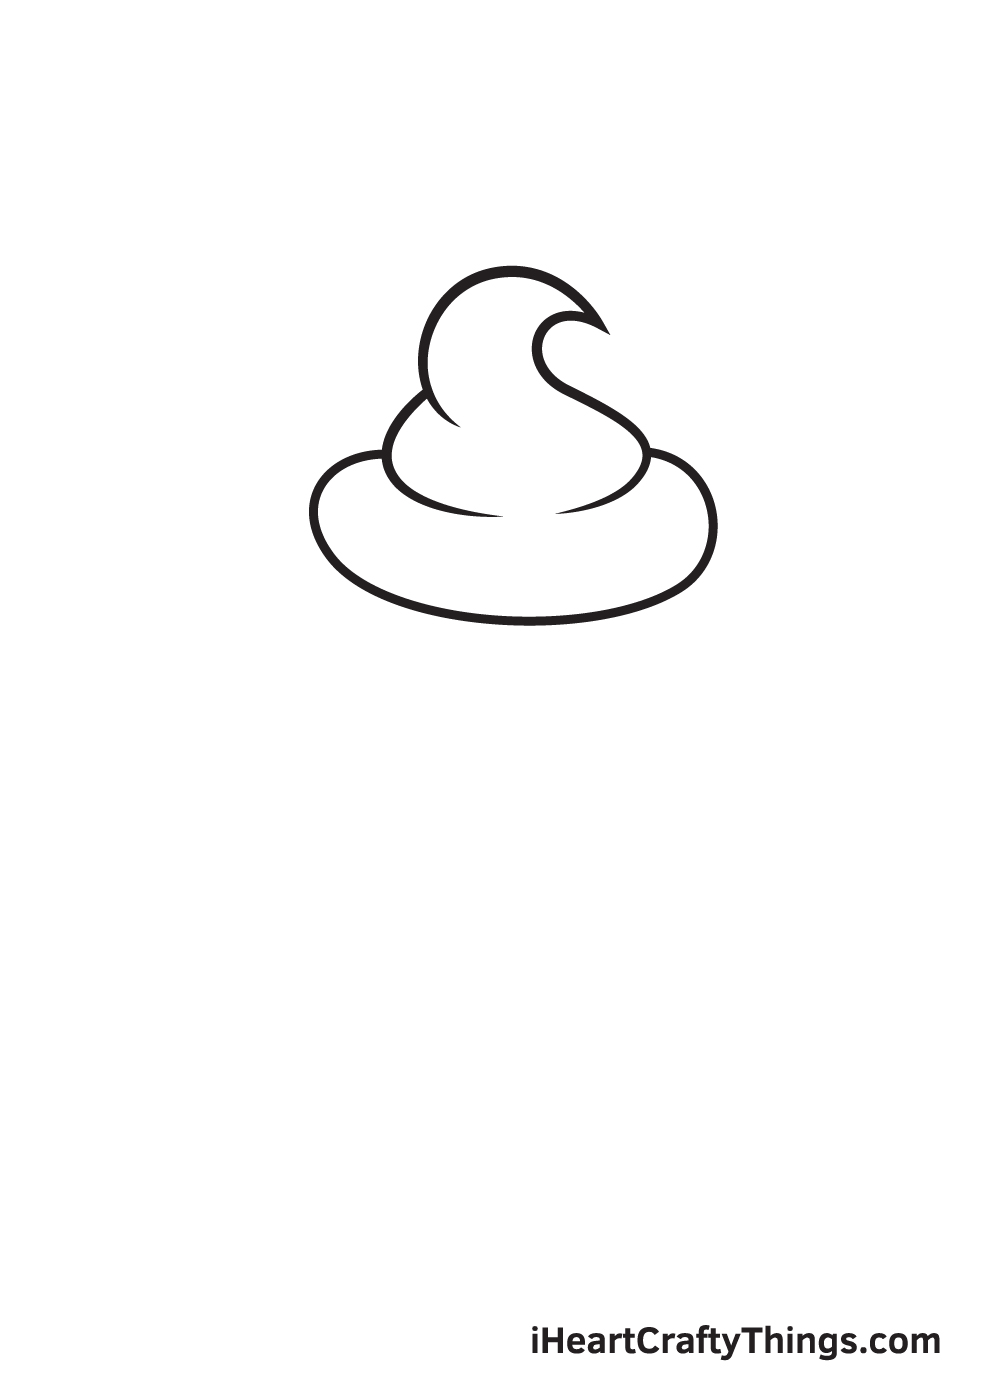
Below the topmost layer of icing, describe an oval shape straight fastened to it. It will be the adjacent layer of frosting swirl. The oval shape shouldn't await too firm, rather it should look as fluffy as a pillow.
Don't stress over making it even. As a thing of fact, the more uneven your swirls are, the more realistic information technology would expect.
Footstep 4 — Draw the Middle of the Frosting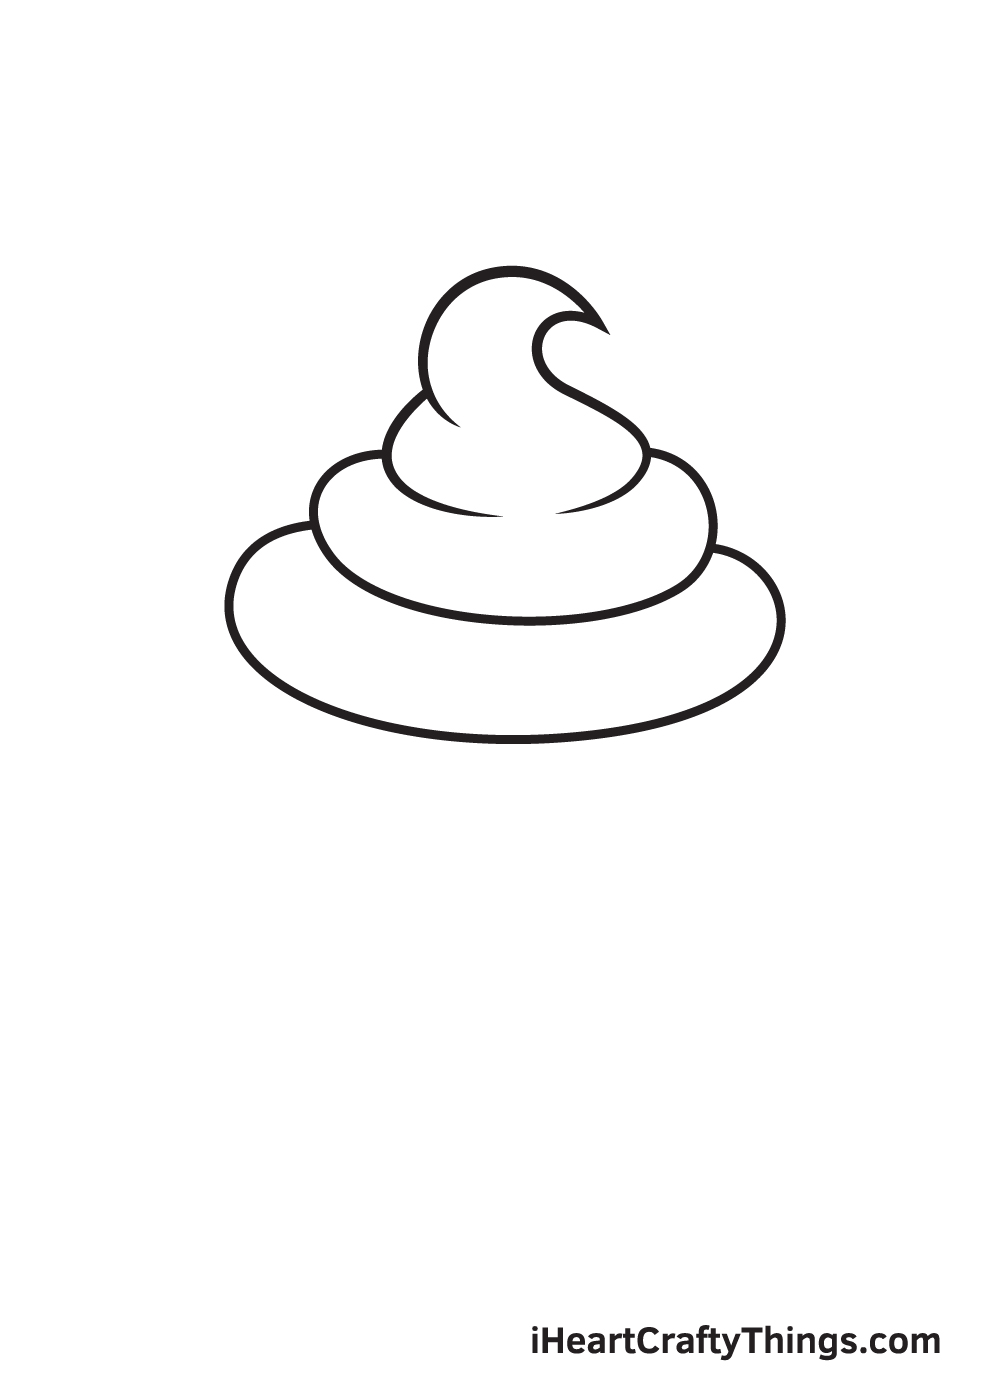
Then, right underneath the previous layer, draw another oval shape that is quite bigger than the previous one. This will serve every bit the swirl in the eye of the icing.
Step 5 — Describe the Last Layer of Frosting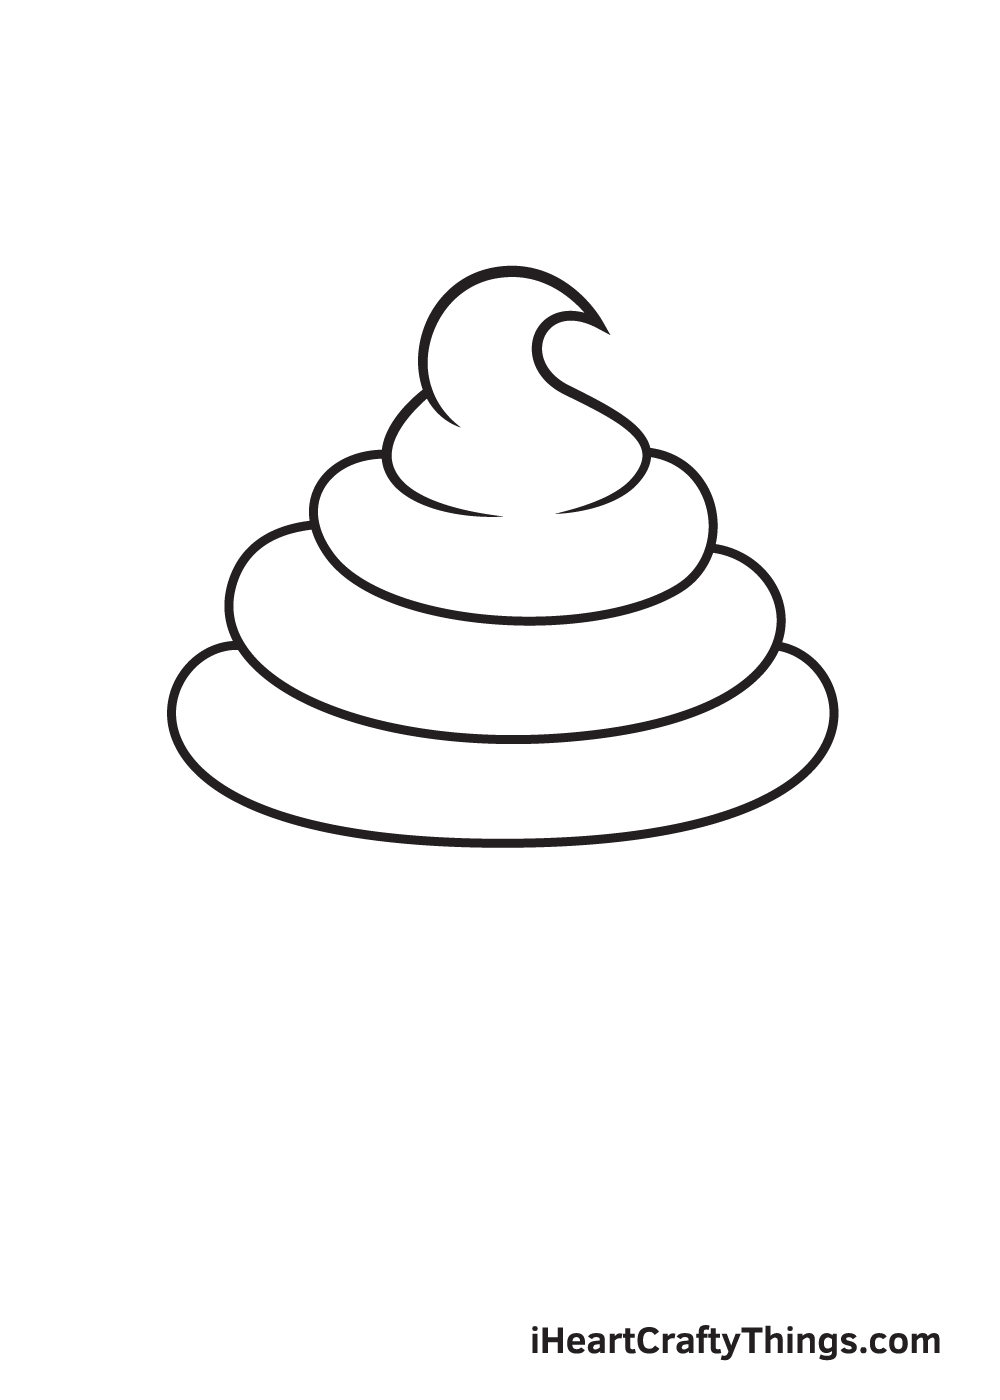
Now, nosotros volition be working on the final layer of frosting. Add together another layer of swirl right below the previous layer by drawing a slightly bigger oval shape.
Make sure that every layer of frosting from acme to bottom is a bit bigger than the previous one. Basically, the sizes of the swirls from top to bottom should be the smallest to the biggest, quite similar to how a Christmas tree is formed.
Step six — Now, Depict the Wrapper of the Cupcake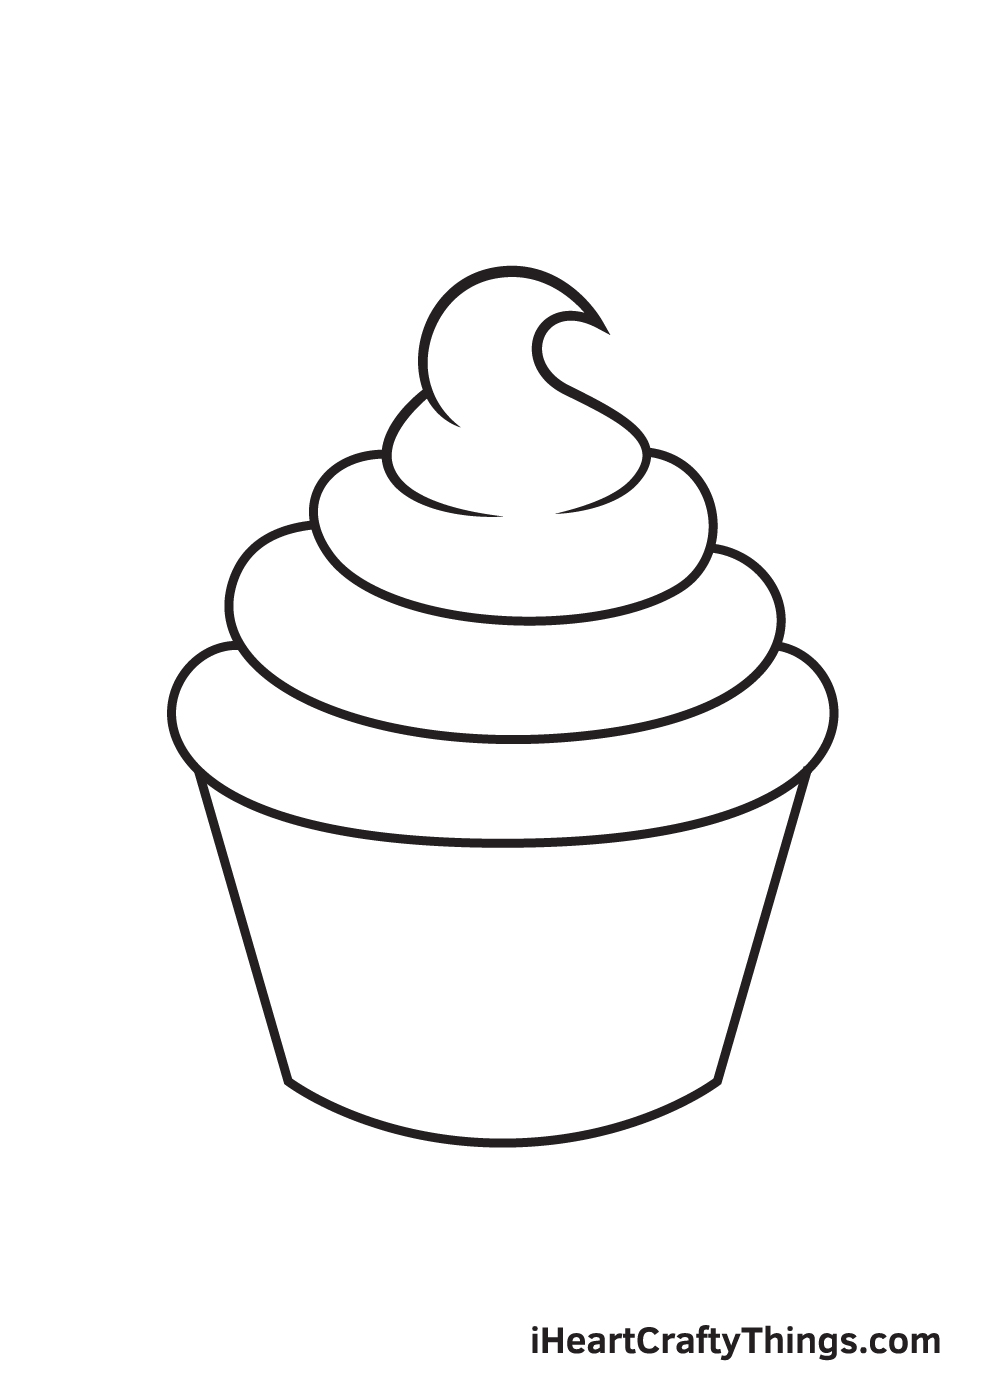
Right underneath the frosting, depict a bucket shape. Go on in mind that the frosting swirls must be just a little flake bigger than the wrapper.
This will make the frosting appear more than thick at the tiptop of the cupcake, making it expect more appetizing.
Step vii — Then, Draw the Folds of the Wrapper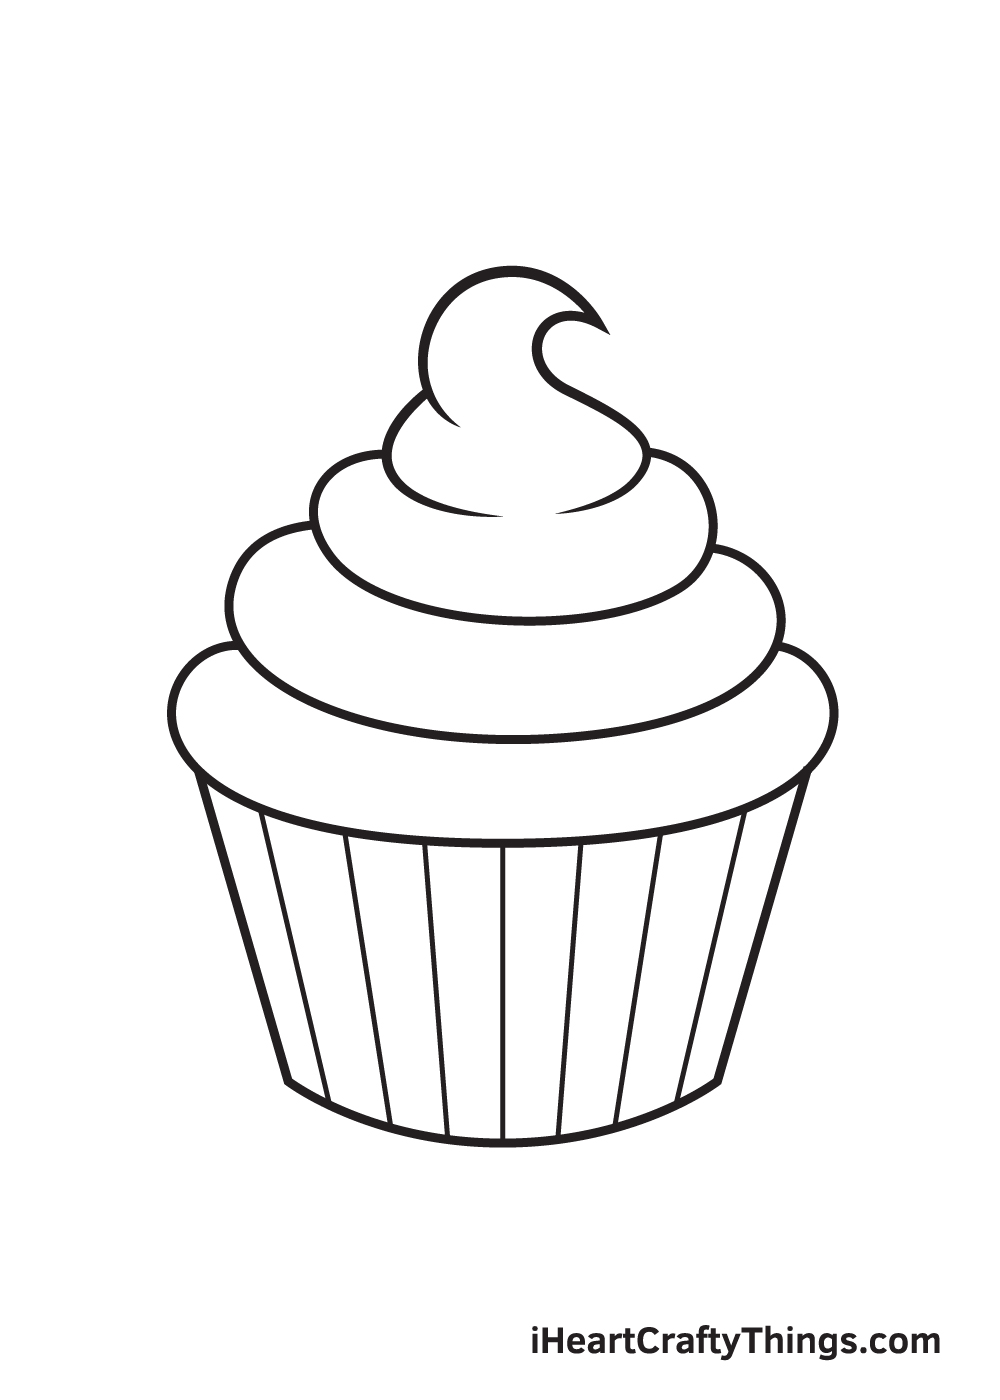
To create the illusion of a folded wrapper, draw parallel and slanted vertical lines across the entire wrapper. This will make the wrapper, as well equally the cupcake itself, look more realistic.
Stride 8 — Put Sprinkles on the Frosting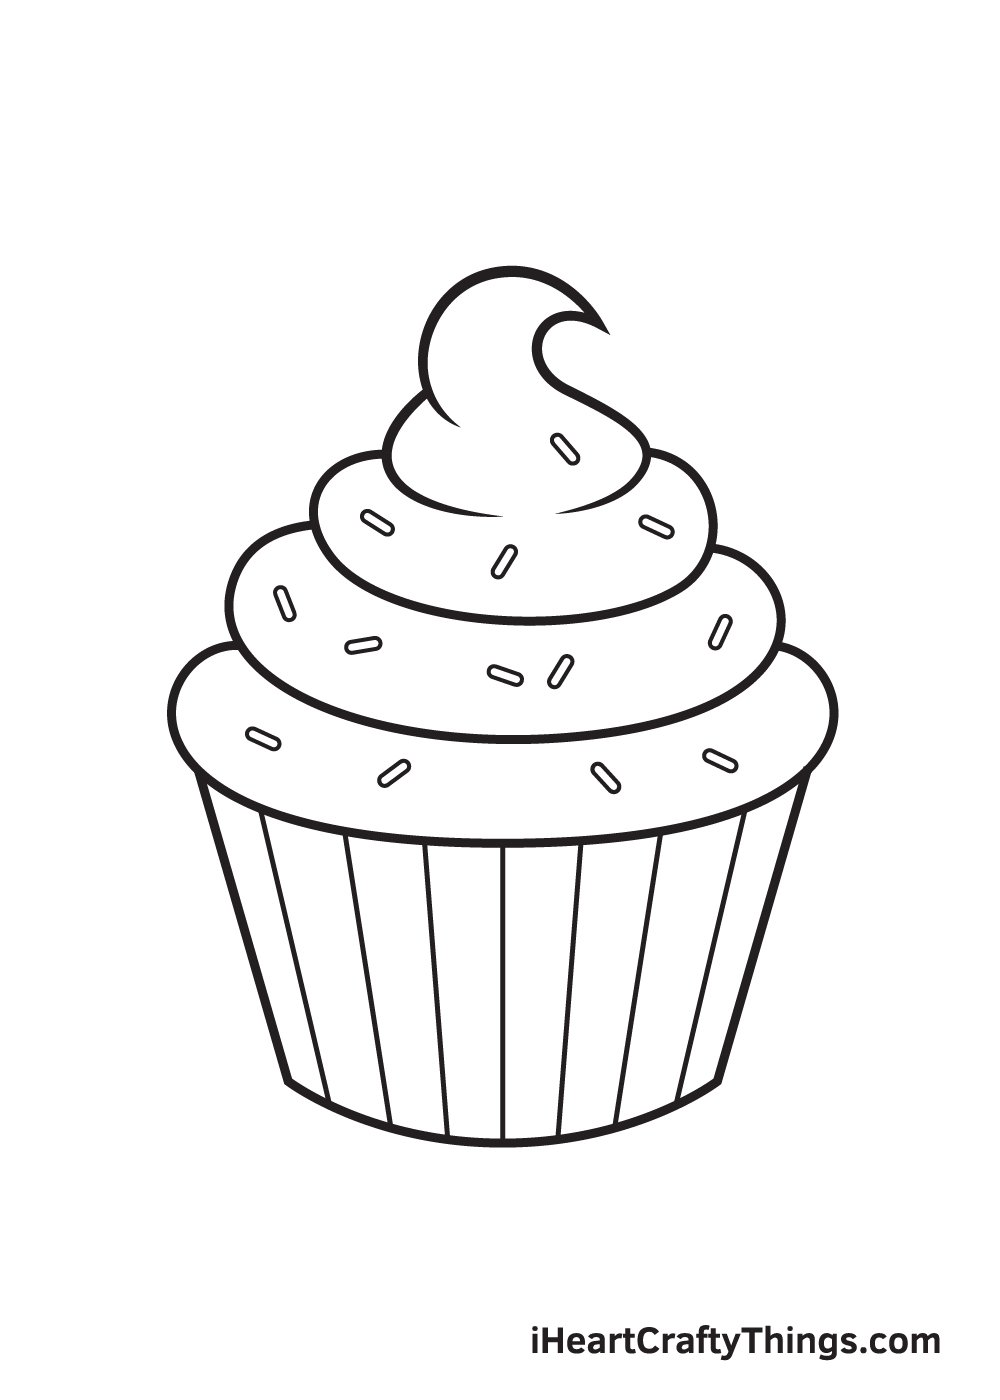
Cupcakes, and whatever other sweet treats, wouldn't exist complete without a hefty amount of sprinkles on summit. And then, of course, we volition be adding sprinkles on this cupcake drawing. You lot definitely should, as well!
Here's a fun fact: did yous know that sprinkles come in a broad range of shapes and sizes? The kind of sprinkles that you see in this illustration is called jimmies, which are tiny carbohydrate strands in curt rod shapes.
There are also sprinkles in the form of spheres, flat circles, and crystals! That gives you lot a lot of options to choose from when drawing your cupcake's sprinkles on pinnacle!
Footstep nine — Add Your Topping of Choice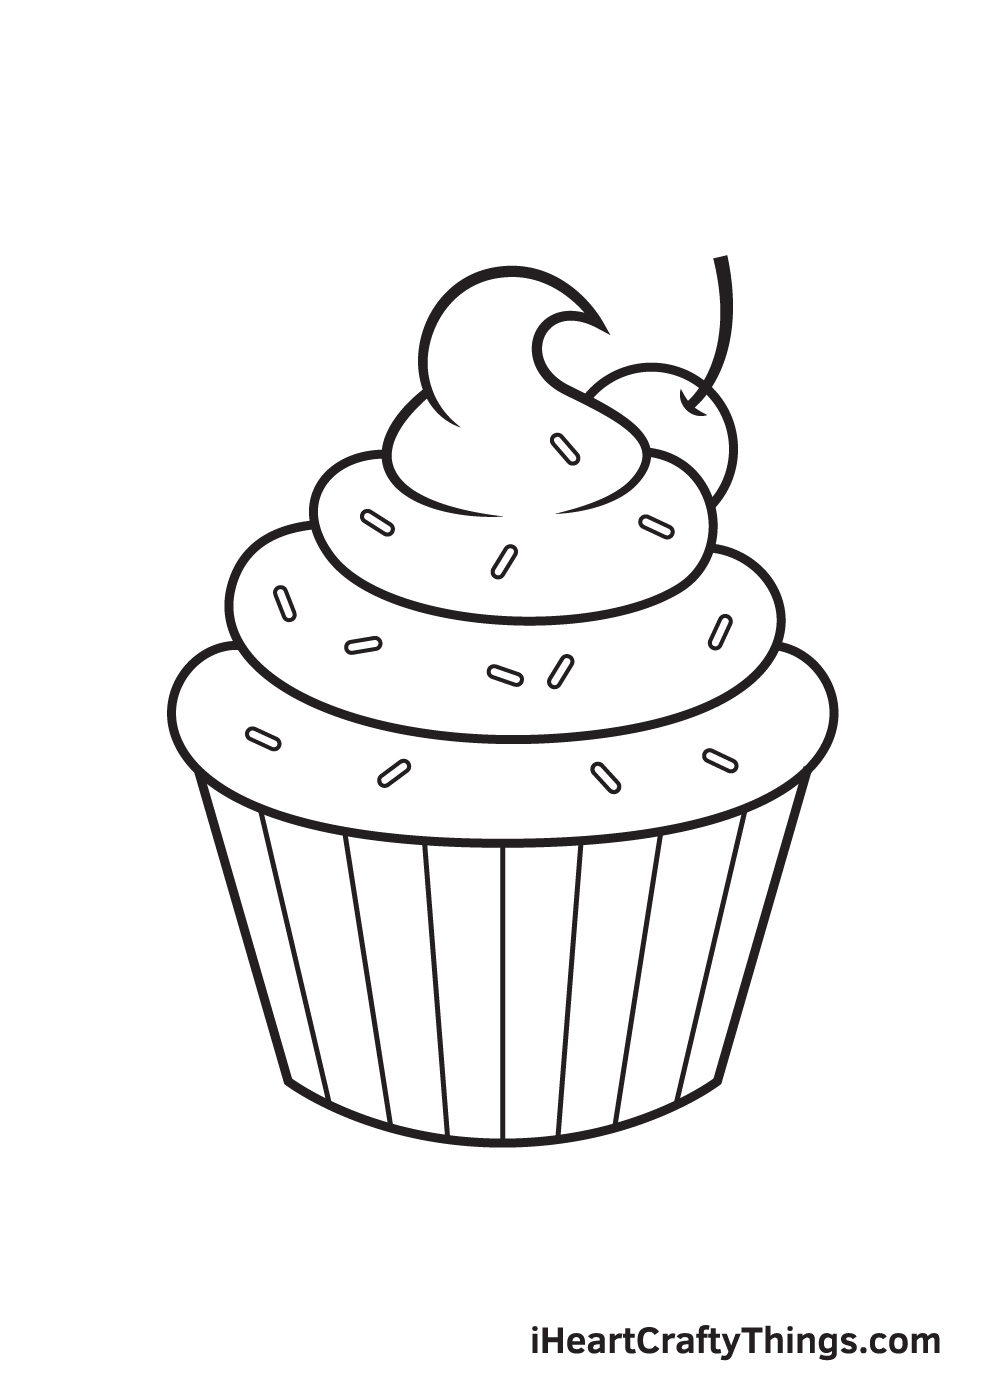
Now, information technology's time to wrap up your drawing by adding a topping of your choice. Equally yous can see in the illustration, we have added a ruddy on top, but experience free to depict any topping you like. After all, it'southward your work of art!
Instead of a red, you can draw a strawberry or perhaps a piece of chocolate. Describe it right to a higher place the frosting and make sure it is completely visible.
Here, you can see the cupcake is well-nigh finished! The only affair it'southward missing is a dash of multiple colors to complete your artwork!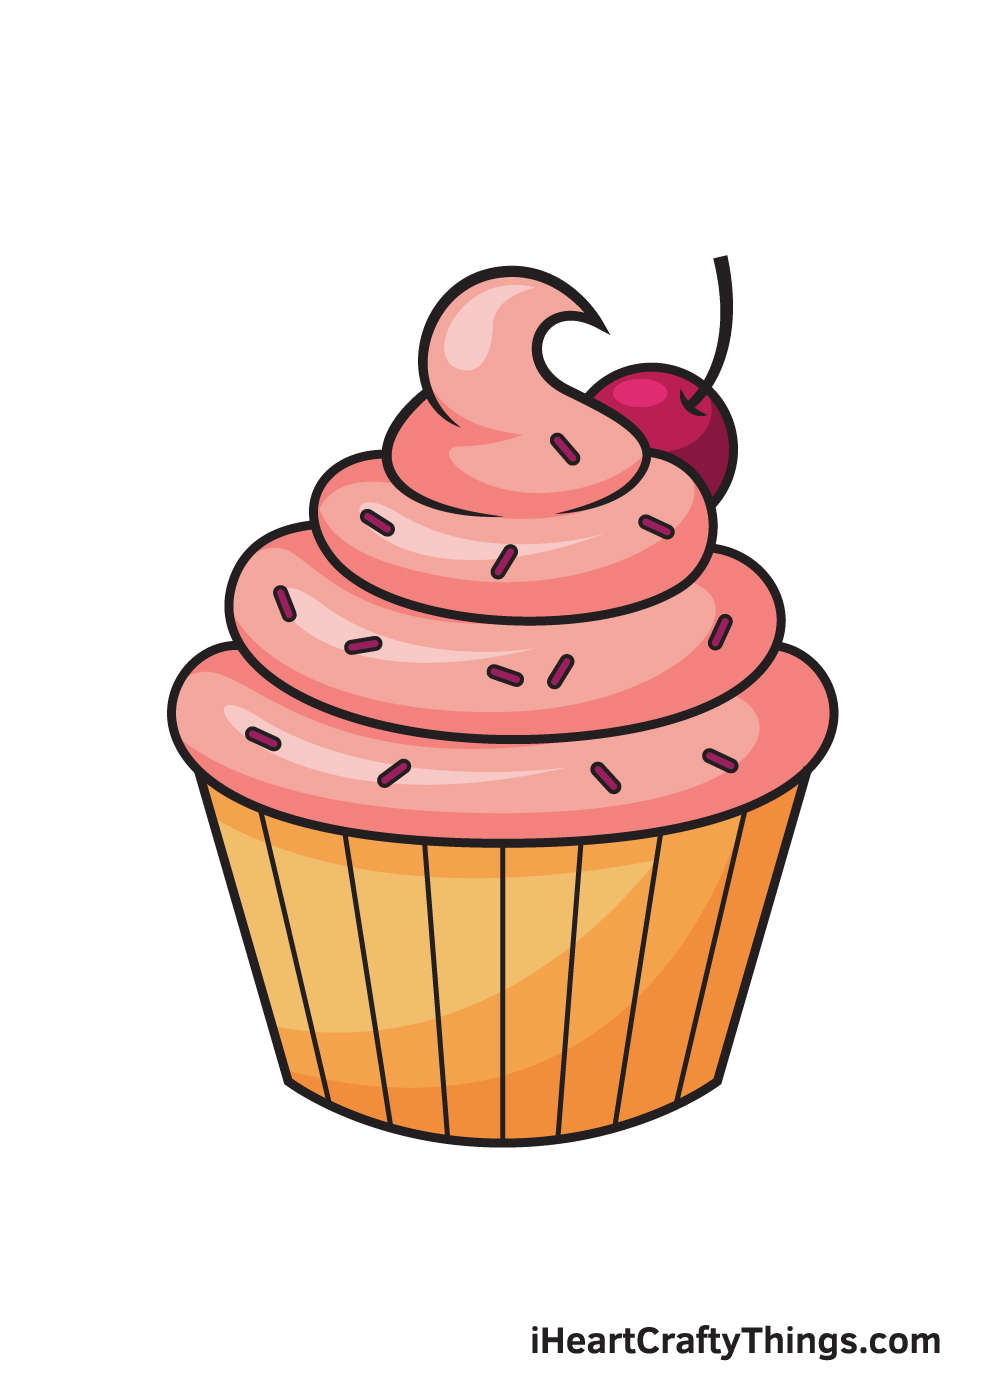
Finally, hither is the most exciting part—filling in the colors for your awesome drawing! This is the function where you tin can show off your artistic skills and your ability to mix and lucifer various colors.
To brand your cupcake look more tasty and colorful, make sure to use dissimilar vivid and vibrant colors. The colors of your sprinkles must be different from the color of the frosting to brand and then they can perfectly complement each other.
Don't forget the color of the cupcake's wrapper too!
Your Cupcake Drawing is Complete!
We hope you savor this step-by-pace tutorial on how to describe a cupcake. With this guide, you lot tin can draw and colour a cupcake along with its complex features and elaborate details in no time.
And the most fun office is, you tin customize its frosting and sprinkles and play with various colors as much as yous like! While you're at it, why not try using different coloring tools every bit well?
Once you've finished your masterpiece, we're certain you must exist feeling very proud of yourself—as you lot should exist! Completing this cupcake drawing is definitely fulfilling.
Make sure to show off your work of fine art and share information technology on our Facebook page and on Pinterest. We're sure it looks amazing!
Nosotros can't expect to see your colorful and delectable cupcake!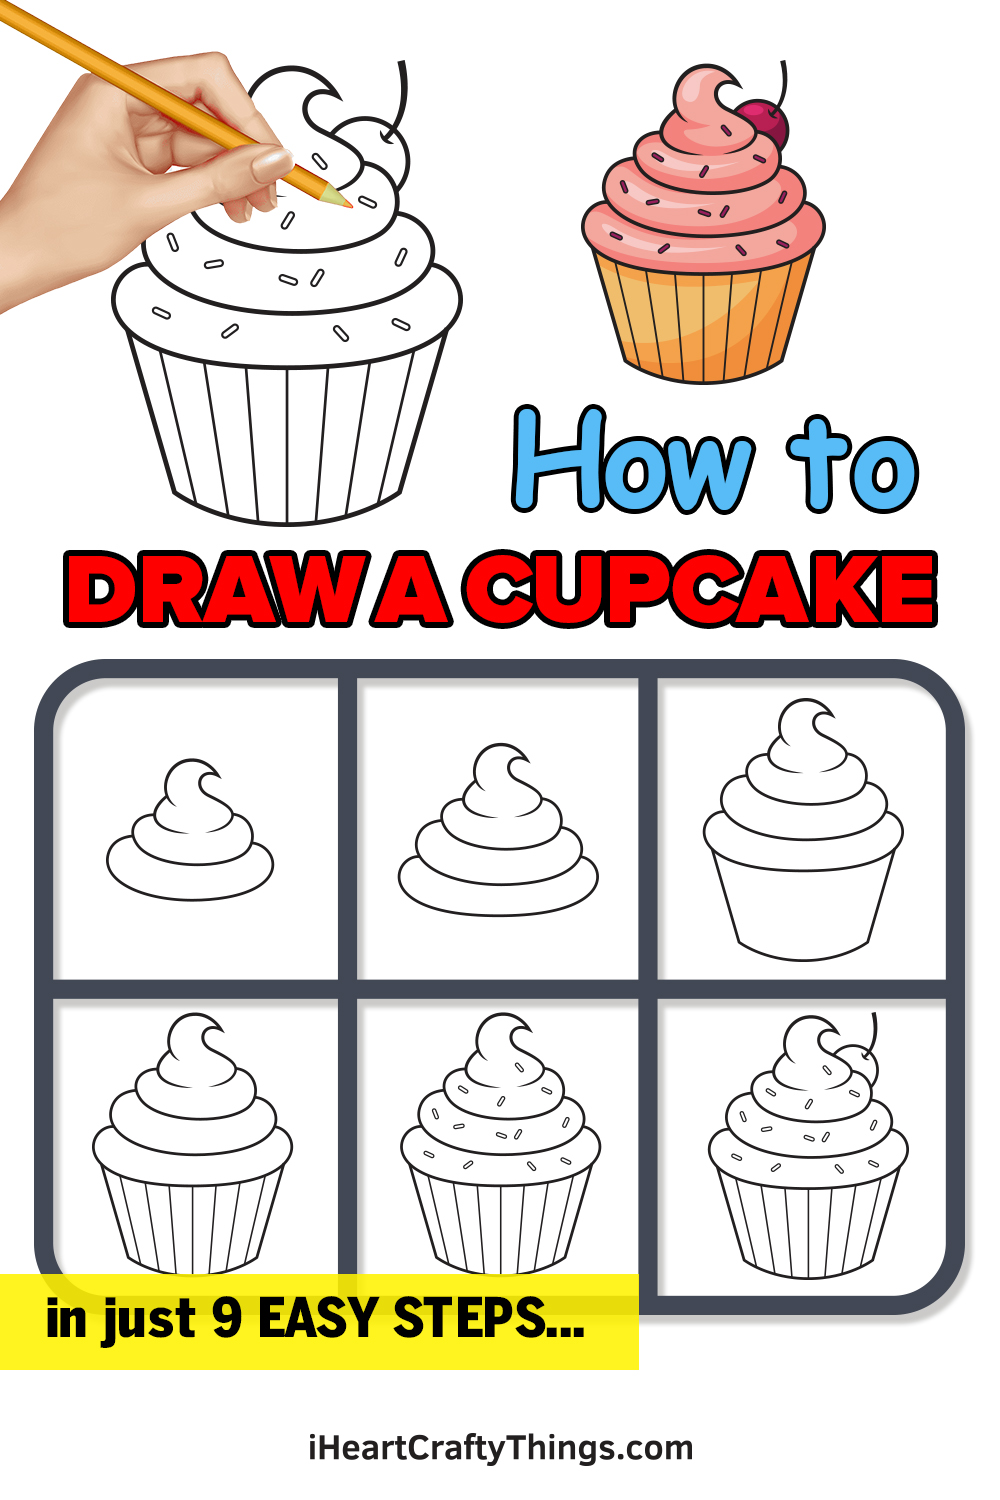
DOWNLOAD HERE
How to Draw a Muffin Step by Step TUTORIAL
Posted by: rosafaince.blogspot.com